The rain beats incessantly on the corrugated iron roof of the unlined hut and I turn up my iPod to counter the noise. Peering through the louvfres I can see the wind whipping spray off the surface of the mist-shrouded tarn, throwing droplets onto the swishing tussocks. Our alpine basin is being lashed by the storm, but we’re cosy in the hut, waiting and hoping patiently that tomorrow will be fine so we can make the high traverse of the Dragons Teeth to Lonely Lake Hut.
The others are in their bunks, in their own worlds, but I’m up and hungry. During the night the hut’s resident mouse ate a hole in my silicone cup and most of the cereal soaking inside it, so my carefully measured half-cup of breakfast was sorely missed in the morning. I go back to my bunk and return to the hut book and read yet another entry recounting a failed attempt at the traverse. Some quick maths reveals that over the past decade there’s been less than two successful attempts a year at the high route – coming from Lonely Lake – and numerous accounts of epics and failures, usually resulting in people descending into the Anatoki River and then climbing back up to our location, Adelaide Tarn. I hope that the direction we’re going in offers a more optimistic outcome.
Our trip started with the long cruise up the Anatoki Valley from just outside Takaka. Under heavy seven-day packs we weren’t rushing, just taking our time and enjoying the ambience of the beech forest and bird calls. Unremarkable for its location, Anatoki Forks Hut is remarkable for the fact that it has a hot shower and, despite being only the first night of the trip, after a long walk the shower feels as blissful as if it’s the seventh day.
The following morning we were up early, amped to be heading for the tops. The day was clear and the short but steep climb to the ridge below Yuletide Peak rewarded us with views out to Golden Bay. Out of the bush the ridge narrowed and became craggy, making for fun travel as we wove our way along its airy crest, picking out the line. We’d aimed for a saddle below Yuletide for lunch and it made the perfect spot; with small tarns, sunshine and comfortable lounging.
Later, high in the sky on the top of the steep sided Yuletide Peak, we scanned the stark, rocky skeletons of Anatoki Peak and the Dragons Teeth, trying to pick out the line we’d be following in the coming days. It’s complicated and steep terrain that drops from their summits into the Anatoki

Valley so, whatever the line was, it looked intricate.
It was fun route finding picking out the sidle around the north-east side of The Needle, and onto the Needles Eye – the narrow col that provides access to the Adelaide Tarn Basin. Remote and beautiful Adelaide Tarn is undoubtedly a tramper’s holy grail. It’s one of those places that’s stark, but cosy; soft, but harsh and there’s something about its scale that makes you feel like you fit there, not like you’re tiny and insignificant. Golden tussocks billowed in the wind, gentle waterfalls trickled over rocks and the lake looked cool and inviting.
We made our way to the tiny hut at the south end of the tarn. There was something perfect about that too. The hut’s sheltered from the southerly, with views north over the tarn and towards Lead Hills and Boulder Lake, another entry point for this secret enclave. Water runs nearby, and grass-covered rock ledges outside the hut make an ideal lounge. The rest of the afternoon cruised by while we lay about in the sun, drank tea, read the hut material and took photos. At dusk I walked up to the saddle south of the hut and photographed building lenticulars to the north. The wind was coming up.
To the south, the Anatoki Valley sat in dark shadows; above, the great fangs of the Dragons Teeth jutted menacingly into the sky. Bellbirds calling from deep in the beech below lightened the moment and I turned and wandered back down the hill for my dinner. By nightfall clag had fallen into our basin and we woke in the night to the sprinkle of rain on the roof.
Late in the afternoon on our third day, the wind dropped and, soon after, it stops raining. A brisk southerly’s lowered the temperature and we bundle up and leave the claustrophobia of the hut to soak up the atmosphere of the place again before it gets dark. It’s different now. There are waterfalls in abundance and a crispness to everything. The air’s so clear. I run around madly trying to capture some of it through my lens.
The next morning, we’re off early. It’s still cold but the sky’s clear and soon we’re descending into beautiful forest on the narrow ridgeline connecting Mt Douglas with the Dragons Teeth. Moss hangs everywhere and astelias are in abundance.
We’re following an unofficial trail that’s been occasionally maintained by local tramper Warwick Briggs. Blazes appear from time to time; tin can lids, cruise tape and the odd cairn as we follow a light ground trail that weaves its way through beech forest, in and out of mossy gullies and around and over bluffs via ledge systems. Often we’re using all four limbs to climb roots and trees. It’s a labyrinthine trail through some cool terrain and we laugh about how much fun we’re having. A wrong turn eats up a bit of time as we probe upwards, traversing under a cliff band and getting closer to the jagged ridgeline, but we realise our mistake and backtrack, finding a sneaky hard-to-spot turn around a rock arête.

After a couple of hours of engaging ‘tramping’ and route finding, the way opens out into a large sloping terrace south-east of the Dragons Teeth and beneath Anatoki Peak. Our goal is to gain the upper section of the Anatoki Spur, a prominent ridge that drops from Anatoki Peak east into the Anatoki River, and it’s apparent we have to find our way through 150-odd vertical metres of scrub-dotted cliffs to get there.
Still following occasional – but more sporadic – markers, we pick our way down through rounded bluffs and scrub, aiming for a scree patch and drainage line in the cliffs that match a vague route description I’d found on the internet. There was once a section of wire cable through the bluffs, but it was removed in 1994. The route’s been known as the ‘Wireless Route’ ever since, and it’s that we hope to find. The travel gets messier as we descend towards the base of the bluff. We lose the track, find it and lose it again and tussle with the bush until we find ourselves at a cairned scree patch. Above that a vegetated drainage cleft soars up the cliff.
It’s one of those tramping days where you’re never quite sure what to expect so we approach the climb with an open mind. We’ve all done our time in the Darrans and scurrying up this kind of ground is standard fare for approaches there.
We gradually gain height; sometimes in the gully and sometimes on the wall to its right. Flax and leatherwood provide most of the handholds, but we climb quite a bit of bare rock too, edging across weaknesses and tip-toeing up slabs.
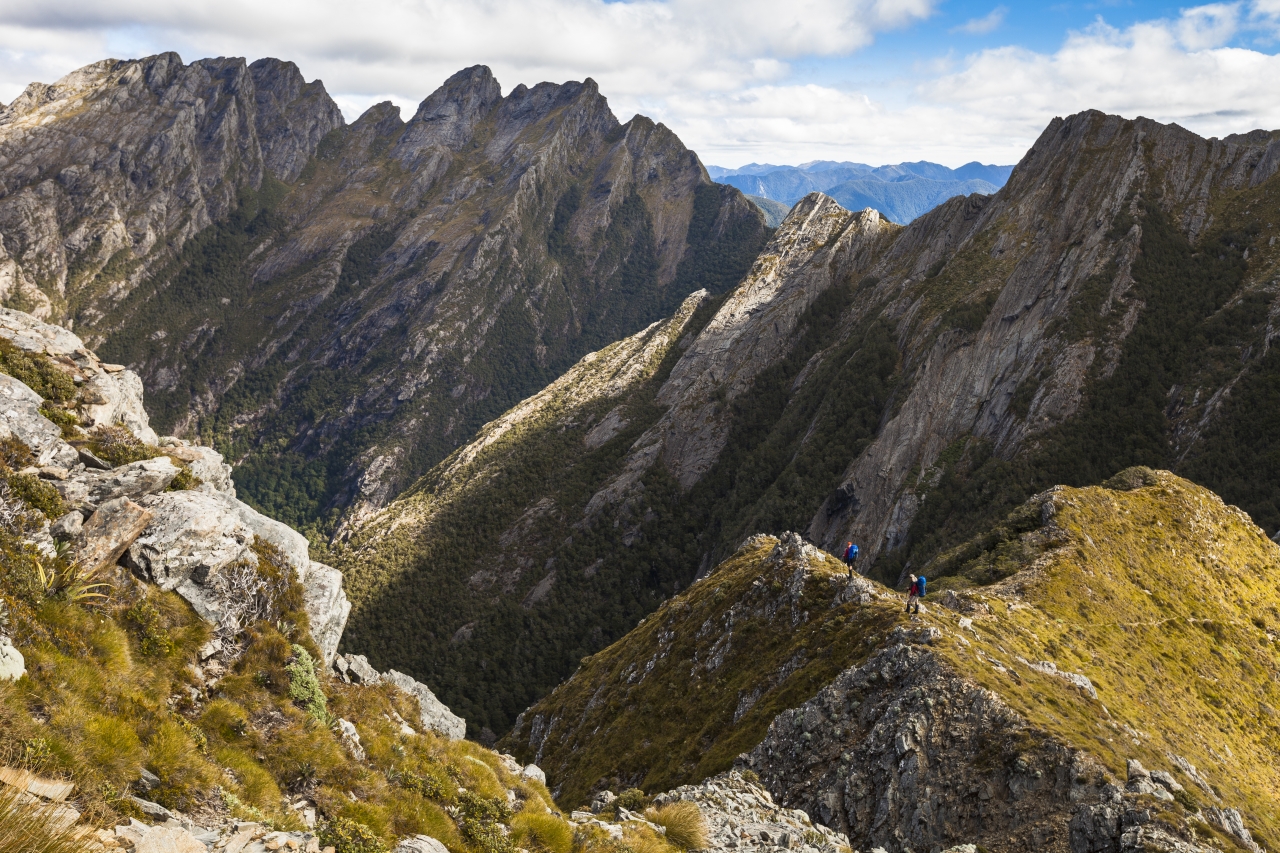
It’s precarious stuff for sure, and although you wouldn’t want to fall off anywhere the intermittent ledges break the exposure. Pete calls for the rope at one point and I pull out the 30m of 8mm line we’re carrying and provide a belay off a big leatherwood bush. It’s hard to tell if we’re on the right route or not – we haven’t seen a cairn since the scree at the bottom – but we all agree you definitely wouldn’t want to be going down the same way without a rope. We’re committed to it though and continue weaving our way up, seeking the line of least resistance until bigger ledges break out right and we follow them diagonally up onto the Anatoki Spur. Where we top out is devoid of cairns, suggesting that we’ve probably taken the road less travelled – but we’ve cracked it and we’re stoked. The dangerous sections and the tricky route finding are behind us, and the route ahead is through friendlier country.

Dumping our packs on a dome of weathered rock, we sit down and take in the view while we eat lunch: the Anatoki Valley is far below and three kilometres to the south-east the crooked finger of the Drunken Sailors beckons. Near there is our destination for the night; Lonely Lake Hut. We push on, over convoluted but spectacular terrain as we follow a series of slabs and whalebacks of rock, crossing boulder fields and picking out cairns ahead. Despite the intensity of our ascent route to the spur, it’s an amazing day’s tramping – one of the best I’ve done in New Zealand – and by the time we reach the basin that cradles Lonely Lake, shadows have crept high on the surrounding peaks.
Lonely Lake Hut’s another wee four bunker, but like Adelaide Tarn it too is in a pristine location, this time nestled into the bush edge, surrounded by crags and with great views to the west. That night we were once again entertained by hut book entries telling of others’ epics on both the high, middle and low routes and entries from hopefuls heading in the direction we’d just come. These are hard earned locations that come with the deepest rewards.
The following day we nipped along the Douglas Range towards Kakapo Peak, with the tops above Fenella Hut our destination for the night. The travel was beautiful, with occasional bush and very quick tops travel along a well worn ground trail. A detour to the summit of Kakapo Peak (1783m), the highpoint of the journey, gave us the satisfaction of visually retracing not only our journey so far, but also the remainder along the Lockett Range.
By mid afternoon we reached a pristine camping spot tucked into stunted beech on the ridgeline just beyond Waingaro Peak. Clouds had been massing all day and by dark were looking threatening. Not long after we tucked into the tent fly, drizzle started and we were woken later by hail pounding our nylon shelter and wind whooshing through the beech.

Silence – and cold – greeted us at dawn. Opening the zip on the fly revealed several centimetres of snow. I got up to catch the sunrise and watched our world turn from monochrome to pink and purple and then orange as the sun broke through between distant peaks under a ceiling of heavy sky. Snow lay thickly on the forest too, well below the treeline, and tendrils of mist wafted above the valley floor.
We deliberated for a while. Travel over the rest of the Lockett Range to Sylvester Hut and the Cobb Reservoir could be problematic with so much snow around, but walking down the Cobb Valley seemed an anticlimactic end to our journey. In the end we chose the former – the cloud was breaking and it was going to be a beautiful day to be on the tops. The price we paid for the scenery was slow travel. The Lockett Range does not see many parties and the obscured ground trail made the route’s frequent entries into patches of beech forest tricky to find, but we persevered and slowly ticked off the spot heights as we neared Mt Benson. Beyond Benson, the ridge became craggier and we found ourselves often sidling on the eastern side and negotiating a couple of tricky gullies. At one point we were sidling a steep snow-covered snow grass slope when Hana slipped and slid 15-metres, thankfully into a safe run-out, before stopping. She didn’t lose any skin, but collected some impressive bruises. Shaken, but not stirred, she picked herself up and soldiered on.
The final climb of the trip took us to the rocky quartz-scattered summit of Iron Hill, above Lake Sylvester. It was late afternoon and we knew the hut was close. The brightness of the day had gone and colour was coming to the snow. A light breeze blew. We took our time, took a team photo, fooled around and climbed onto the summit blocks, perched on rock ledges and soaked up the placid atmosphere of the place. Then we took our packs again – they felt light now – and turned to the slopes leading down to the lake.
There was walking to do, but the journey was over.