


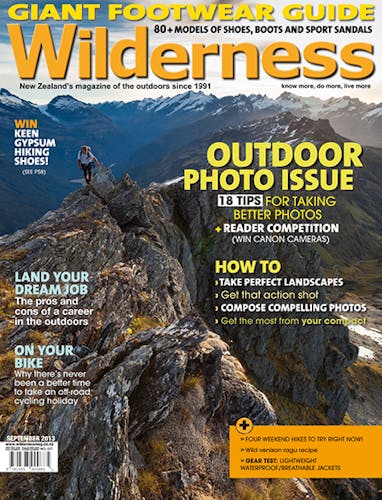
Further your photography with these top tips from outdoor photographer Mark Watson
Wilderness magazine readers visit some beautiful and remote places and have a chance to capture unique landscapes and situations in the outdoors. If you’ve ever felt like your shot fell short and you could have expressed a scene better, or you want to start to capture images with a view to submitting to Wilderness, this article’s for you.
The following tips are written to help you take your photography further and to help you creatively capture the amazing moments you see in the outdoors.
Compose compelling photos
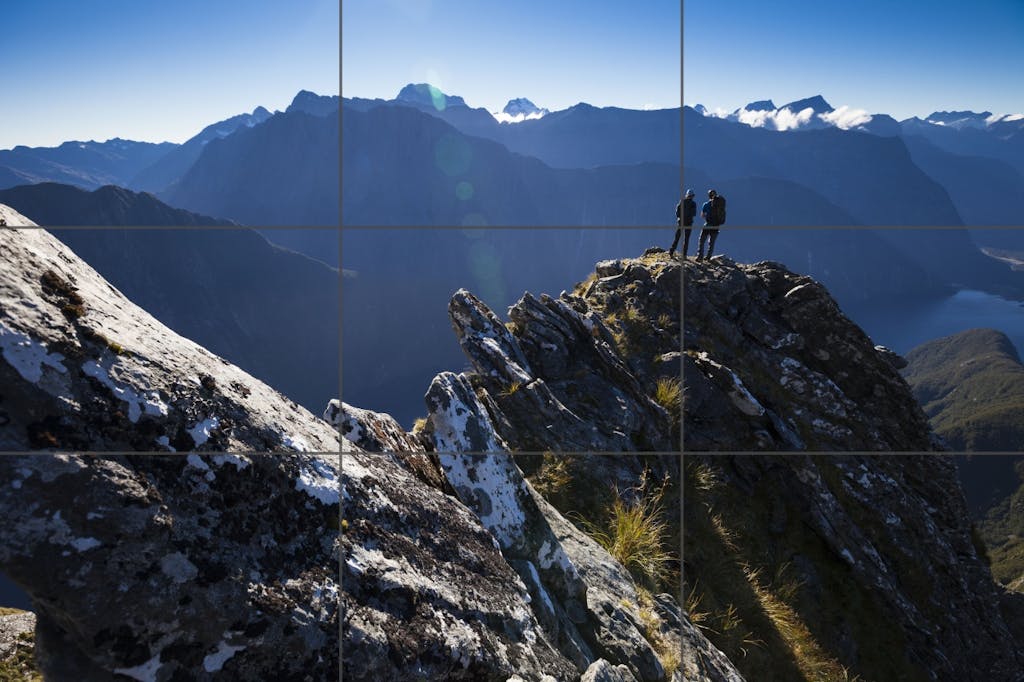
Rule of thirds: This photo taken on Mitre Peak is a classic example of a strong lead in line, combined with the rule of thirds. The foreground rock and ridge serves to add depth to the photo and draw the eye to the people. Focal length 16mm: 1/320 Sec @ f8 and 200 ISO. Photo: Mark Watson
There’s an old adage that says: You have to know the rules to break the rules. This is certainly true for composing photos. Apart from picking a good subject in the first place, how you compose your shot is a fundamental of photography. It’s more important than the technical details, but it’s important to remember that it’s the synergy between subject, composition and how you capture it technically that creates great photos. Creativity can be applied to any and all of these three variables.
A fundamental of composition is the Rule of Thirds. First written about in 1797, this visual arts guideline – also used in painting, design and cinematography – proposes that your scene is divided into nine equal parts by two equally-spaced horizontal lines and two equally-spaced vertical lines, and that important compositional elements should be placed along these lines or their intersections. Utilising this technique can maximise tension, negative space and balance in your composition.
Nearly every time I shoot I apply the rule of thirds as a framework for creating an image, but I don’t always use it. There are times when more powerful compositions can be made without it, such as centering your subject, or putting an element on the extreme edge of your frame.
What you choose to leave in, what you leave out and exploring the relationships between objects in your composition are all key considerations in creating a dynamic photo. Sometimes it’s best to study a scene without your camera and really think about how you can emphasise it or represent why it clicked with you emotionally in the first place. Once you have visualised like this you can think about which focal length (i.e. wide or telephoto) might be appropriate to render the scene in one dimension.
Wilderness images that are visually strong often have common compositional techniques applied to them, such as lead in lines, vanishing points and out of focus areas or foreground elements that create a sense of depth.
Next time you see a photo you like, think about what it is that makes it feel ‘right’ to you. How do the elements of the photo work together? How does the choice of composition suit the subject? When shooting, try different angles and focal lengths to emphasise your subject.
Identify your subject and emphasise it
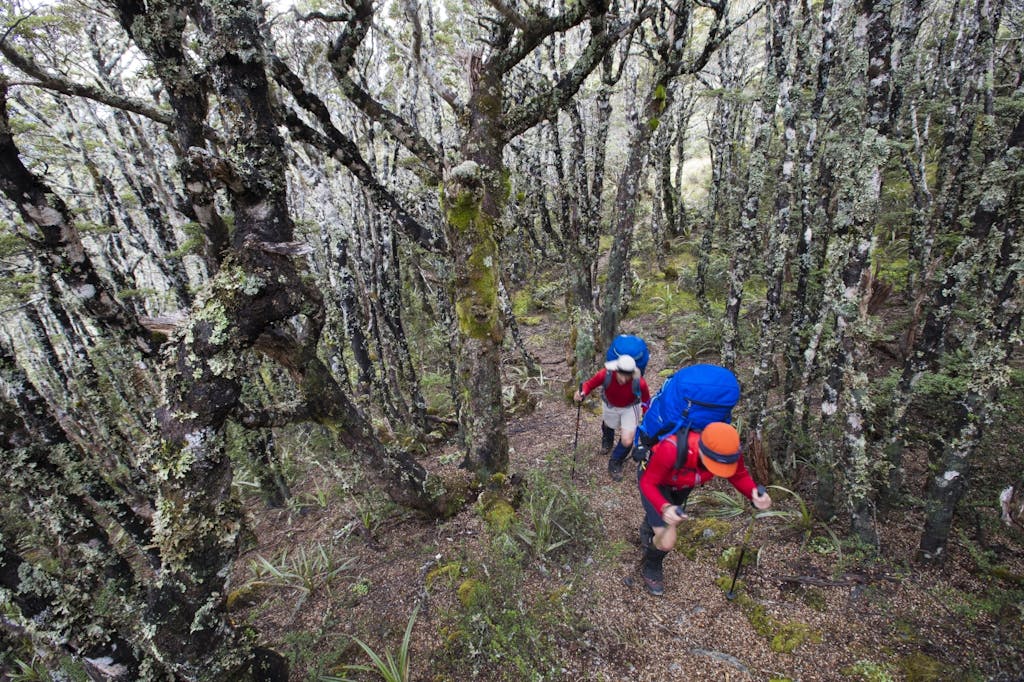
A slow shutter speed rendered the mountain biker as a streak of motion. Because it was shot too slow to handhold normally, I held the whole camera against the tree trunk to make sure there was camera shake. Note the strong lead in line of the tree trunk and root. Focal length 24mm: 1/10th Sec @ f5.6 and 1250 ISO. Photo: Mark Watson
Every photo needs a subject. Many people make the mistake of arriving at a vista or seeing a moment and, swept in the novelty of the situation, pull out their camera to ‘capture’ it without really thinking about how they are capturing it. Every time you shoot, pause a moment to think about what the subject is, or what the story is that you are telling and then how you are going to make the most of that situation from a visual perspective. The basics of composition apply here, and so do creative considerations such as applying fast or slow shutter speeds to either emphasise or freeze movement or a shallow or deep depth of field (the area of the photo that is in sharp focus) to draw the viewer’s eye to the subject.
Taking your time and trying lots of angles and compositions of the same subject is a good way to develop this skill. Ask yourself: Does the scene work better from a high perspective or a low one? Are there distracting elements that I should crop out? Scan the edges of your frame before you squeeze the shutter. Sometimes moving only a short distance on your feet can completely change how the elements of a photo work together – it can be the difference between a great photo and an average one.
Anticipation and pre-visualisation go a long way towards making good photos. If you can anticipate those moments when your tramping companions are about to be silhouetted against a dramatic sky, or dwarfed by a giant river boulder, then you’ll be ready to capture those moments dynamically.
A technique I often use when shooting tramping and climbing photos is to compose the scene as a landscape photo (without a human element). I’ll look for lead in lines, scale, vanishing points and negative space and then pre-visualise how and where I’ll work a human figure into it. Once you have your scene composed you can wait until your subject walks to the right place and then click.
Get your head around shooting modes
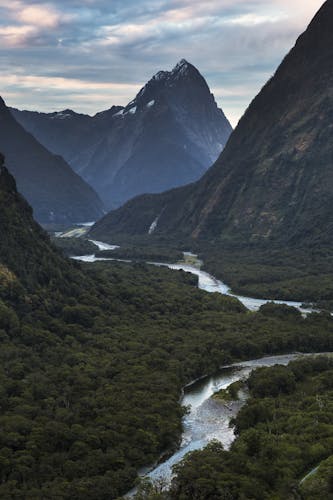
Only loosely structured around the rule of thirds, this photo combines a strong lead in line (the river) with overlapping diagonals that frame Mitre Peak in the background. I shot this image in AV mode, so I could set the aperture at f11 for great depth of field and maximum sharpness. I shot with a tripod to allow the relatively long shutter speed. Focal length 62mm: 0.5 Sec @ f11 and 100 ISO. Photo: Mark Watson
Many people make the mistake when they first buy a DSLR camera of thinking that they have to shoot on manual mode to be a ‘real photographer’, or just find the move from full auto too daunting, because they are juggling three variables: shutter, aperture (f-stop) and ISO all of which have their own trade-offs.
These days, most major camera brands have the following modes, or equivalent, on their manual-capable cameras: P (exposure priority), AV or A (aperture priority) and TV or S (shutter priority) and M (full manual).
P is basically an auto mode whereby the camera chooses the shutter speed and aperture for a correctly exposed photo and shifts them as a reciprocal (if the aperture changes the camera will change the shutter speed to suit). It’s a step away from full auto as the user can change the ISO, but the camera is still making the decision and removing creative control from the photographer, although you can still override the camera’s decision with exposure compensation. It’s useful for beginners if you need a quick shot and don’t have time to think about it too much.
AV is the mode that a lot of serious photographers shoot on the most. It calculates the exposure automatically, and then shifts the shutter speed as a reciprocal as the photographer changes the aperture. Suppose you want to create a really shallow depth of field look in your shot and move from f8 to f3.5 (aperture more open). In AV mode the camera will automatically pick the correct shutter speed to suit whatever aperture you have picked. You’re still taking creative control, but you’re also making the most of the calculating abilities of that very expensive computer you’re holding in your hand.
TV works the same way as AV, but shifts the priority to the shutter speed. Which is useful if you decide you definitely want to shoot your next shot at say 1/4000 second (very fast) to capture a moving bird. Set that, and the camera will pick an aperture to suit.
M is really most useful when you want to lock down settings, such as for panoramas, astro-photography and flash photography, but in a typical situation I’ll work these settings out in AV mode and then lock them in Manual.
For beginners who are struggling with the variables of shutter speed, aperture and ISO, locking down two of these settings and just changing one is a great way to understand how that setting affects your photo. Al
l three control how light creates your photo. For example if you set your camera on AV mode and set the ISO to auto, all you have to think about is changing the aperture and the camera will still meter and expose correctly. Once you’re comfortable with that, take the ISO off auto and start changing that too as available light changes.
Shoot super sharp shots
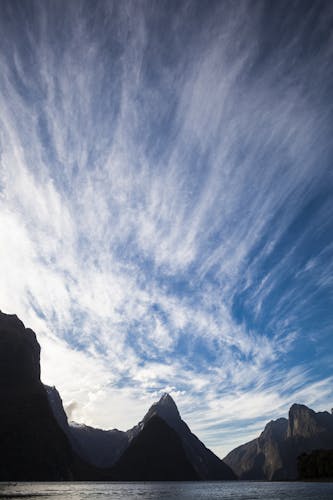
Taken to emphasise the expansive sky and streaky clouds, this photo of Mitre Peak and Milford Sound largely dispenses with the rule of thirds but still forms a strong composition. I shot at f11 for a sharp shot with everything in focus. A tripod and mirror lock-up were used. Focal length 16mm: 1/6th Sec @ f11 and 100 ISO. Photo: Mark Watson
Blurry photos or shots with insufficient depth of field are the bane of the beginning photographer, so here’s a few tips to help you get things sharp.
1. Shutter speed should at least match focal length. For example, if you’re shooting at 35mm, then your shutter speed should be at least 1/40th sec, if not faster. If you’re at 50mm, then it should be 1/50th or faster. With telephoto shots or large lenses (i.e. 70mm or greater) a safer rule of thumb is to double it to allow for heavier lenses and subjects that are further away.
2. Stop the aperture down. A small f-stop, say 2.8, means your aperture is wide open and a large f-stop means your aperture is smaller (stopped down). Wide open, lots of light can reach the sensor, allowing for faster shutter speeds and a shallower depth of field. Stopped down a bit, say to f8, means less light reaches the sensor, so a longer shutter speed will be required, but the depth of field (DOF) will be greater. In low light this means you might need to use a tripod. Greater depth of field (higher f-number) equals more overall sharpness in your photos edge-to-edge and also means you use the sharpest part of your glass. Most landscape photographers hover in the f8–f11 range for photos that have both great depth of field and maximum sharpness. Many lenses will allow you to shoot up to f22, but with most lenses this will not yield any greater depth of field and in some cases will result in a softer shot due to it being at the lens’ extreme range.
3. Use a tripod. If you’re serious about getting publishable shots, you need to be shooting when the light is stunning, and this is usually when it’s at low levels. Here’s a scenario: your tent is pitched in the midst of a beautiful alpine landscape, the light’s stunning, but dropping. You’re shooting on AV at 200 ISO (see next tip), f8 (for a decent DOF) with a focal length of 28mm. You sneak off a couple of shots at 1/30 second (a safe shutter speed) but as the light drops, your shutter speed falls to 1/20 second. You want to keep your exposure variables locked down: if you increase the ISO more, the shot will develop signal noise (an electronic equivalent of high grain) and if you open the aperture up the DOF will be too small, so the only alternative is to shoot with a tripod and remote release to keep that shot sharp and detailed. Mirror lock up (on conventional DSLRs) is also a good idea to prevent vibration once your shutter speeds get really slow.
4. Keep the ISO sensible. ISO (ASA in the days of film) is a measure of the sensitivity of your sensor to light. The lowest ISO for most cameras is 100-200. Overall, it’s always best to shoot at the lowest ISO you can because it will give you a cleaner image. As ISO creeps up, electronic noise will appear as random red and green specks and an overall graininess and you’ll also notice your shots have less tonal range (less colour depth) which will appear as gradations in your shot, especially if you try to open the shadows or vigorously colour correct them in processing.
Note that the recent higher end DSLRs such as Canon’s 6D and 5DMKIII or Nikon’s D800 produce much more faithful images even at high ISOs, allowing you to safely push into the 600-1000 ISO range and still produce very clean images.
Get the most out of your compact camera
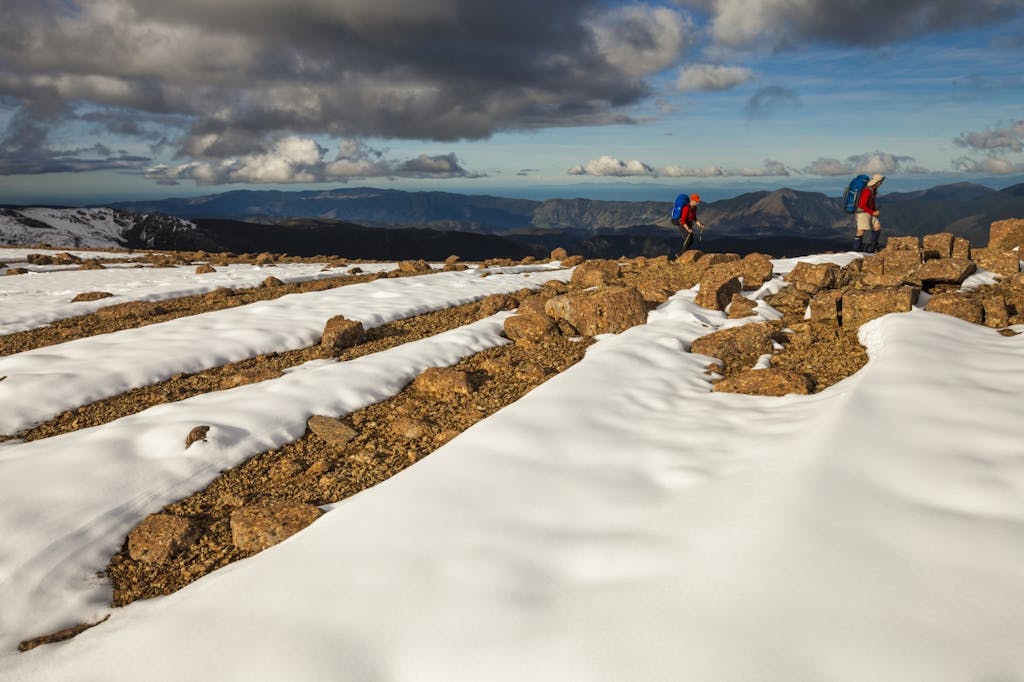
Strong diagonal lead in lines and adherence to the rule of thirds make this a strong photo. The eye is immediately drawn to the bright figures on the horizon. I eyed this composition up and then waited for my friends to walk into the right part of the scene. Focal length 17mm: 1/400 Sec @ f11 and 100 ISO. Photo: Mark Watson
Many Wilderness readers will be shooting with compact cameras (point and shoots). Here’s some pointers to get the most from these cameras:
1. Don’t shoot above 200-400 ISO unless you really have to. Compact cameras have much smaller sensors than mirrorless or DSLR bodies and tend to produce very noisy images once shooting at 400 ISO and higher. For publication and good printing, shots need to be low-noise.
2. Hold it with both hands! If I received a fiver every time I saw someone shooting holding their camera with one hand I’d have myself a new lens by now. Unless you are shooting with a very fast shutter speed, you’re unlikely to get a sharp shot with one hand, and besides – take that photo like you mean to get a good one: pause, consider, compose, shoot… with your eye to the viewfinder (or display) and both hands on the camera.
3. Shoot RAW for more latitude. Not all compact cameras allow this setting, so if you’re shooting JPEG at least make sure that compression is at the minimum and it’s set to capture the highest resolution possible. Avoid using in-camera settings that oversaturate or oversharpen photos. When you shoot with a compact camera, the data captured is RAW (unprocessed) and is then processed by the camera’s default settings to create a JPEG. If you have the ability to shoot and save as a RAW file, you can process this file yourself with editing software such as iPhoto, Aperture or Adobe Lightroom. RAW files are analogous to having a negative, in that they are essentially ‘undeveloped’ and can be processed to suit the individual photographer’s style. They also preserve far more information, allowing considerable latitude when correcting over- or underexposed photos.
Buying a camera?
The last couple of years has seen huge changes in the camera market, with DSLRs becoming cheaper and mirrorless micro 4/3 cameras becoming very popular. The compact (point and shoot) camera market has virtually died (except for higher end models) with the proliferation of phone cameras.
There’s a strong argument for mirrorless or micro 4/3 cameras for outdoor users. This type of camera has an electronic viewfinder (EVF) only. There’s no need for the bulky prism and mirror of the traditional DSLR with these cameras and hence the body is much lighter and more compact. Additionally, the EVF also displays a live histogram, focus peaking and handy heads-up info. The sensors on the very best of these cameras (the Olympus OMD and the Sony NEX) have sensors that very nearly equal the best DSLRs in quality. Most importantly, they have very low noise and a wide tonal range. Many market experts believe that mirrorless cameras will completely replace traditional DSLRs in the next few years and there is already a wide range of pro-quality lenses for these cameras. The advantages of these cameras for outdoor recreational users are obvious.
While phone cameras are convenient, most of them do not have sufficiently good quality sensors for magazine print, nor do they allow much in the way of creative control over your photo. If you’re serious about getting good photos, a good quality advanced compact or mirrorless camera will give you far better images.
Features to look for in a camera for outdoor recreation photography include:
* Wide angle lens (at least 28mm) to let you capture those sweeping vistas and to shoot close to a subject and still include its surrounds for context, such as a camping scene
* 12 megapixels minimum for large reproduction
* A ‘fast’ lens, with a maximum aperture of f2.8
* Ability to capture RAW
Quick tips
People outdoors
1. Make your tramping and wilderness people photos stronger by positioning the subjects so that they are walking into the shot or looking into the shot, not out of it. If the viewer can see where the subject is walking to, it creates a greater sense of anticipation and storytelling. If your subject is going to be walking or looking out of the shot, then use a lead-in line such a track or bridge to give the image structure and to show the subject’s journey.
2. Keep your distance: generally I like to be a short way ahead or behind my companions so that if I see a composition I like I have time to frame it up and then let the subjects walk into the shot. Waiting for your subjects to be skylined against a dramatic morning or evening sky can make a powerful image. You can use people in your shots to indicate the awe and scale of your surroundings, too. If you’re shooting vertical, with that Wilderness cover in mind, make sure you leave room for the masthead!
Mountain and landscape
Wait for the right light: The golden hour (the first and last hour of sunlight) is the time when you will probably capture your most memorable images. Low light, beside bathing the landscape in amazing colour, also creates shadows which add considerable depth and atmosphere to your photos. One of the best things about shooting during the golden hour is that the behaviour of the light and shadows is often unpredictable, meaning you might find yourself responding to the scene differently to how you expected. It’s a chance to unleash your creativity. The 30 minutes before and after sunset can also be a very good time to shoot, especially in snow-covered landscapes.
Water
Watch out for reflections in tarns and lakes, and especially for the colour the water’s surface takes on when the sun is low. Rivers, being constantly in motion, can add a considerable dynamic to any image. Using a slow shutter speed (anything from 1/30th second to 30 seconds) will let water take on a flowing, in-motion, or even misty effect. Long exposures will also make the surface of a rippling lake appear smooth, adding greater reflection and a sense of tranquility to images.
Huts and campsites
Shooting overnight stops is a great way to document and illustrate everyday moments of life in the backcountry. Think about shooting cooking and camping images close with a wide angle lens to make the viewer feel immersed in the scene. The warm glow of candle light can add great mood to a hut shot (interior or exterior) and with a tripod you’ll be able to capture low light scenes of campfires or tents illuminated by candlelight. Under the full moon can be a special time to capture camping scenes when the extra light can make scenes appear as if they were shot in daylight.
